


Welcome to another Confection Couture cookie decorating tutorial. In this how to stencil cookies tutorial we will show you how to stencil four different cookies from our summer-themed South Beach cookie stencil collection. We will walk you through basic how to stencil cookies techniques, how to airbrush multi-colored cookies, and how to airbrush striped cookies.
All of our stencils are made from a durable and reusable 10 mil food grade mylar and can be used to decorate cookies with either airbrushing or royal icing. We used four colors of DecoPac Airbrush Food Coloring: Black, Mauve, Honey and Lime Green.
Scroll down to watch our How To Stencil South Beach Cookies video tutorial.


Supplies to Stencil Beach Cookies:
- Madrid 2 cookie cutter
- 2" Circle cookie cutter
- Thick Stripe Background Stencil
- Pineapple Accent Stencil
- South Beach Accent Cookie Stencil
- DecoPac Airbrush Food Coloring
- AirGenie Airbrush system
- Stencil Genie
- Quadrant Masking Tool
- Gyro-Cut craft and hobby cutting tool
- Cookie magnets
How to Airbrush Beach Themed Cookies
For our first cookie, we started by airbrushing a simple mauve background with the AirGenie airbrush system tool. We will stencil a pineapple on this plaque-shaped cookie later. We used four different colors to airbrush our South Beach cookies. If you use multiple colors, be sure to clean your Airbrush Tool before adding a new color to the tool.
To airbrush a plain cookie background, first add a few drops of the DecoPac airbrush food coloring (we used mauve coloring) to the AirGenie airbrush system tool. Shake the food coloring bottle well before dropping coloring into the airbrush system.


Always test out the airbrush spray on a paper towel or white paper prior to spraying each cookie. Adjust as necessary using the knob on top of the AirGenie.

Use circular motions to apply the first color in light, even coats. Once you have finished airbrushing the background, set the cookie aside to dry. After the cookie has dried we stenciled a pineapple on top of the background. While you wait for the background coloring to dry, you can stencil the next cookie.
How to Airbrush Multicolored Stripes on a Cookie
On our second cookie, we stenciled a striped background with our Thick Stripe Background cookie stencil in two colors, mauve and honey. This is a timelessly classic cookie stencil style, perfect for summer desserts. You can just stencil a striped background as we did, or personalize the cookie further with a monogram initial.


To stencil a two colored striped background on our cookie, we airbrushed one color at a time. First, we masked off every other stripe with Glad's Press'n Seal. This way when we airbrush the first coloring, every other stripe will be covered and we can airbrush those stripes in our second color later.
To cover the stencil template cutouts you don't want airbrushed in the first color, first lay a piece of Press'n Seal over the cookie stencil template. Smooth the Press'n Seal from the center out over the stencil template to remove any bubbles and wrinkles.

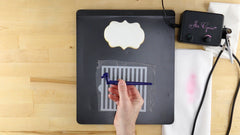

Next, use the Gyro-Cut tool to cut around the stripes you want to airbrush with the first color. The Gyro-Cut craft and hobby cutting tool is ideal for trimming around desired stencil elements – in this case, every other stripe. Hold the Gyro-Cut at an angle that’s 90° to the stencil template to cut the Press'n Seal around the elements you want to stencil first. The blade automatically turns as you change direction.
We cut around every other stripe. Peel the Press'n Seal off of the stripes you have cut out. Now it is time to position the stencil template.
How to Position the Stencil Template with the Stencil Genie Tool
It is very important that the stencil template lies flat on top of the cookie, otherwise when you airbrush the cookie, coloring might fly under the stencil template and blur the design. This is called "under-brushing" and is a common cookie stenciling mistake.
The Stencil Genie will help keep the cookie stencil template in place while you stencil.


Place the bottom half of the Stencil Genie holder down. Position the stencil template over the bottom half of the Stencil Genie holder and place the top half of the Stencil Genie holder over top to secure the cookie stencil in place. The magnets on each half of the Stencil Genie holder will keep everything in place while you airbrush the cookie. Now place the whole assembly over the cookie you want to airbrush.


As you are airbrushing the cookie, you can also use a clean chopstick, knitting needle, or similar tool to hold down any portion of the stencil template that might start to lift away from the cookie. Anywhere the stencil template peels up a little is an opening for coloring to spray beneath the stencil template, and ruin the airbrushed design.
Once you have finished airbrushing the first color of stripes, place the cookie aside to dry. We will finish the second color of stripes later. Leave the stencil with Press’n Seal as is – this will save you time later. You can move on to stenciling your next cookie!
How to Stencil Small Summer Cookies
While we wait for those stripes to dry, learn how to stencil smaller, beach cookies. First, we airbrushed this flamingo cookie stencil. In our South Beach collection, our summer stencil designs are cut into the same stencil template, so you can combine as many summery designs on your cookies as you like.
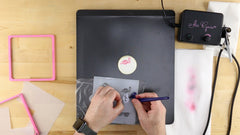
To stencil one design at a time, use the Quadrant Masking tool to frame one stencil design and mask the other stencil cutouts.


Place the bottom half of the Stencil Genie around the cookie and then lay the stencil template over the cookie where you want the airbrushed image. Use the Quadrant Masking Tool to frame the cutouts you are about to airbrush, this will mask the other stencil cutouts so that you only airbrush the design you want. Now lay the top portion of the Stencil Genie over top of everything else. Cookie magnets can also help keep the stencil template in place as you airbrush. You can place these closer to the stencil cutouts you will airbrush.

For the Flamingo stencil, we airbrushed the body in mauve and the legs in black coloring. We covered everything except the flamingo body with the Quadrant masking tool (including the legs). After we airbrushed the flamingo body and we waited a few minutes for the coloring to dry. While we waited, we cleaned our Airbrush tool and loaded the next color.


When the coloring had dried, we repositioned the Quadrant Masking Tool to cover everything except the flamingo legs and airbrushed the legs in black. You can also use Glad Press'n Seal as we did above instead of the Quadrant Masking Tool for this step. The flamingo cookie is finished!
Now, Airbrush Sunglasses Cookies
Next, we airbrushed some cool shades on our beach cookies. We used the Quadrant Masking Tool again to isolate the sunglasses stencil cutouts and the Stencil Genie and cookie magnets to hold everything in place. Remember to airbrush in thin coats of coloring.


Check the sunglasses off your beach list!
How to Stencil Striped Cookie Part 2
Once the coloring has dried, you can finish airbrushing your striped cookie. For our second color of stripes, we used Honey, a lovely golden sand color. You don't need to reposition the press and seal to stencil alternating stripes, just turn the stencil 180 degrees and position the stencil (in the Stencil Genie) over the cookie.
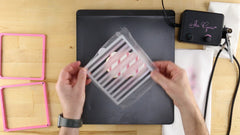


Airbrush the second color of stripes. The mauve-and honey-striped cookie is finished. Yum!
How to Stencil a Pineapple Cookie
Next, bring back the mauve background plaque cookie. Now that the coloring has dried, we can finish decorating this summer picnic cookie by airbrushing a pineapple in the center of the cookie.


We airbrushed our pineapple fruit with our Honey coloring first and then stenciled the leaves in Lime Green. To start, mask off the leaves of the pineapple with the Quadrant Masking Tool as we did before. Practice spraying light coats of coloring on a paper towel before airbrushing the pineapple base. Stencil the pineapple in several light coats of coloring.


When you have stenciled the pineapple base, wait a few minutes for the coloring to dry. Leave the stencil template in place. Clean your Airbrush tool and prepare it with the Lime Green coloring. Again, practice spraying on a paper towel. When the cookie is dry, reposition the Quadrant Masking Tool to cover the pineapple base and isolate the pineapple leaves. Airbrush the leaves in Lime Green.
One Fresh Pineapple-Coming Up!
Your South Beach Cookies are ready to party!
Watch our How to Stencil Summer Cookies Video Tutorial:
Our South Beach Cookie Stencils are fun, summertime cookie stencils featuring classic beach designs including sunglasses, pineapples and flamingos. Decorate the perfect beach picnic desserts with our South Beach Cookie Stencils Collection.
This summer, Confection Couture has just the latitude adjustment you need with the South Beach Cookie Confection Collection. Airbrush summer themed cookies with South Beach Cookies stencils from our new cookie stencil collection. Bring edible sunshine to your beach picnics this summer with beach themed cookies. This collection features three beach-themed stencils that can be combined in to make your own custom designs!
Find more how to decorate cookies tutorials on our confectionary blog and video tutorials gallery.