


You won't need a basket to spread the joy when you bring out this Happy Easter to You Cookie Collection from Confection Couture!
Here's what you'll need:

- Happy Easter to You Background with Message Cookie Stencil
- Lamb and Chick Cookie Stencil and Matching Cutters
-
Moscow Plaque Cookie Cutter
- AirGenie Airbrush System
- Gyro-Cut Craft and Hobby Cutting Tool
- Cookie Magnets
- Plastic Bottle with Dropper Tip
- Quadrant Masking Tool (x2)
- Stencil Genie
- Screen Genie
- DecoPac Airbrush Food Coloring
- Tangerine
- Gold Shimmer
- Honey
- Aqua
- White
- Midnight Black
- Sugar Cookie ingredients
- Royal Icing ingredients
- Glad Press'n Seal
- Paper Towels
Getting Started
The first step, of course, is to bake and ice your cookies!
Masking


For masking intricate stencil elements, such as the egg and ribbon design from the Happy Easter to You pair, try using Glad Press'n Seal.
First, cut a piece of Glad roughly the size of the stencil and place over the stencil. Use you fingers to flatten out the plastic, removing any bubbles or wrinkles.
Use the Gyro-Cut craft and hobby cutting tool to cut around the edge of the stencil and peel away the excess. Then, trim around the egg-shaped ribbon and bow. Carefully peel away the plastic covering the ribbon (and area inside it), leaving the interwoven background covered.
Preparing to Stencil


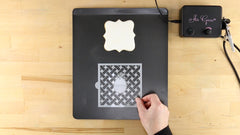
Next, separate the two halves of the Stencil Genie and place the thicker portion (for thicker cookies) down on your work surface, magnets facing up. Place the stencil on top of the square and lock it into place using the other half of the Stencil Genie.
Now, place the assembly over the cookie with the ribbon design in the desired location. Add cookie magnets, in stacks of two, three, or four around the cookie to further aid in holding the stencil flat against the curved cookie surface.
Load 5-6 drops of Tangerine DecoPac Airbrush Food Coloring into the reservoir of your AirGenie airbrush tool. Always test out the spray on a stack of paper towels prior to airbrushing each color and cookie. Adjust the flow as needed by turning the knob on top of the unit.
Apply the color in light coats moving the airbrush tool in a small circular motion.
Mixing Colors


For the light gray of the lamb cookie, try mixing a couple of squirts of white colorant with a drop or two of black in a dropper bottle. Mix thoroughly and test out the color on a sheet of white paper. Adjust the ratio of white to black if needed to achieve the perfect shade.
Stenciling the Lamb Body


For simple masking needs, use a couple of Quadrant Masking Tools. After centering the lamb background in the center of your Stencil Genie, place the masking tools on either side to protect the surrounding areas of the cookie from overspray.
If any areas of the stencil are still tending to lift away from the cookie, use a chopstick or long needle to press down each area as you pass by with the airbrush tool.
Again, apply the color using light, even coats.
Stenciling the Chick Body


To achieve the bright yellow of the chick cookie, mix some Gold Shimmer with some Honey colorant using about a 50/50 mixture.


Use the Press'n Seal to mask off the body of the chick and cover the legs. Protect the open corner using the Quadrant Masking Tool and airbrush as you did earlier.
Stenciling the Basket Background


Next, cover the basket weave stencil once more with a new piece of Press'n Seal. Trim around the egg/ribbon again - only this time remove the plastic surrounding the ribbon. This will allow you to airbrush the weave pattern in aqua while protecting the orange you've already airbrushed.


If you still have some orange loaded into a spare airbrush tool, mask off the legs and beak of the chick stencil and color those using the aforementioned techniques.
Cleaning Your Stencil Tools


Before changing out colors in an airbrush tool, it will be necessary to clean it. To accomplish this, first disconnect the hose and rinse out the reservoir 3-4 times using clean water. Next, reattach the hose, fill the reservoir with water, and run it through the tool on the highest setting. Repeat this step, once more with water, and then a third time using using an inexpensive 100-proof vodka. Continue to run air through the tool for a few seconds after the reservoir is empty to ensure that no liquid remains.
To clean the stencils and masking tools, simply rinse them under water and then dry them completely using paper towels or a lint-free dish towel.


Next, load some petal pink into the airbrush tool and mask off the ears and nose of the lamb stencil. Airbrush these elements in pink.
Stenciling the Black Elements


Repeat the masking procedure using the Glad Press'n Seal for the eyes of both the chick and lamb designs. Load some black into a clean airbrush tool and stencil these elements on their respective cookies.


For fine details, like the words "happy EASTER to you", try using the Screen Genie to help keep the delicate lines nice and crisp!
After placing the stencil over the bottom portion of the Stencil Genie, lay down the Screen Genie and lock everything together with the other Stencil Genie piece. The rest of the process remains the the same.
Your Happy Easter to You cookies are now complete and ready to add some cuteness and cheer to your holiday this spring!
