


Get back to nature and get back that smile with these Happy Camper Cookie Stencils from Confection Couture!
What can you I use to stencil cookies?
Whether it’s airbrushing or using royal icing, Confection Couture has everything you need to stencil the perfectly beautiful and whimsical cookie! This includes an incredible selection of stencil designs for all occasions, airbrush systems, colorants, and accessories.
What kind of icing do you use for cookie stencils?
Royal Icing works best for either coloring and creating the stencil itself or for creating a perfect surface onto which to airbrush your stenciled design.
Can you airbrush cookies?
It’s easy to create beautiful designs on cookies or cakes using our incredible selection of stencils and accessories!
What do you need to airbrush cookies?
Confection Couture has everything you need to create whimsical designs on your cookies or cakes for any occasion!
What is the easiest way to decorate cookies?
Using stencils, in conjunction with either airbrushing or royal icing, is a super easy way to create exciting themed cookies for any holiday or celebration or just for the fun of it!

- Happy Camper 3 Piece Cookie Stencil Set
- AirGenie Airbrush System
- Gyro-Cut Craft and Hobby Cutting Tool
- Cookie Magnets
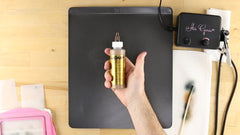
- Plastic Bottle with Dropper Tip
- Quadrant Masking Tool (x2)
- Stencil Genie
- Screen Genie
- DecoPac Airbrush Food Coloring
- Harvest Brown
- Emerald
- Silver Shimmer
- Midnight Black
- Super Red
- White
- Bronze Shimmer
- Sugar Cookie ingredients
- Royal Icing ingredients
- Glad Press'n Seal
- Paper Towels
Baking
The first step, of course, is to bake and ice all the cookies that you will need!
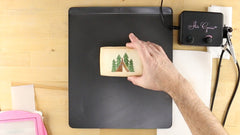
Shading the Borders


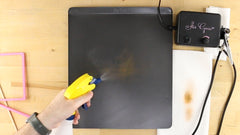
DecoPac Airbrush Food Coloring is perfect for projects like this. For the shaded border, shake your bottle of Bronze Shimmer and pour 4-5 drops into the reservoir of the AirGenie airbrush tool. Test out the color on a spare cookie or white sheet of paper prior to airbrushing if desired.
Lightly spray the edge of the cookie, using a slight sweeping motion and rotating it as you move to achieve even coverage all around. Once finished, place the cookies aside.
Mixing Colors


For the evergreen tree elements of the cookies, mix Emerald and Silver Shimmer in roughly equal parts. You can mix them in a dropper bottle, which comes with a dropper tip. Once mixed, shake the bottle and pour 4-5 drops into the reservoir of the AirGenie airbrush tool. Test out the color on a spare cookie or white sheet of paper. Add more of any of the colors as needed until you achieve the desired shade.
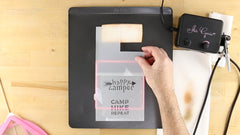
Masking


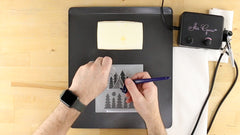
To mask off intricate design elements, cut a piece of Glad Press'n Seal roughly the size of the stencil and place it over the top, pressing it into place to remove any bubbles or wrinkles.
Now, take a Gyro-Cut craft and hobby cutting tool and trim around the desired element - in this case the tent element between the trees. Turn the blade sideways and use it to lift the corner of the cut plastic. Then peel it away leaving everything else covered.
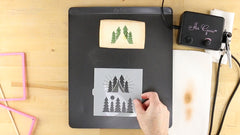
Preparing to Stencil


Separate the two portions of you Stencil Genie and place the thicker side down, magnets facing up. Next, place the stencil over the top with the tree and tent design centered in the middle of the square.
Place a Quadrant Masking Tool above and below the design to protect those areas of the cookie from overspray. Next, place the Screen Genie over the top and lock everything into place using the remaining piece of the Stencil Genie.
Stenciling


Place the entire assembly over the cookie with the design properly positioned where it will be airbrushed.
Lastly, use cookie magnets, in stacks of three or four to further help keep the stencil flat against the cookie surface.
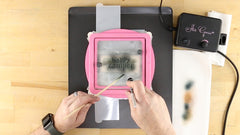
Be sure to test out the volume of spray on a stack of paper towels prior to airbrushing each cookie and color. Adjust the flow as needed by turning the knob on top of the unit.
You can also use a long needle or chopstick to press down any of the stencil edges that are continuing to lift away from the cookie as you move around with the airbrush.
Apply the color in light coats using a small, circular motion. Once finished, place this cookie aside for now.
Finishing the Green Elements


With the plastic still on the stencil, trim around the lower trees leaving the moon covered. Next, position the stencil in the Stencil Genie so that the two leftmost trees and moon are in the center of the square. Use two Quadrant Masking Tools to surround the design and protect the edges of the cookie from overspray. Add the Screen Genie and top portion of the Genie and airbrush as you did earlier.
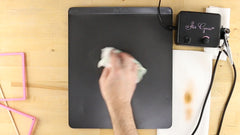
Cleaning the Stencils and Masking Tools


Finishing the Green Elements


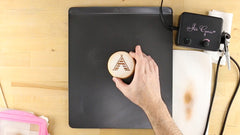
Now, use the Quadrant Masking Tools to mask around the "HIKE" text and airbrush it with the green onto one of the small round cookies.
Dark Brown Elements


For the brown elements of the cookies, mix a squirt of Harvest Brown with a drop or two of Super Red. You can mix them in a dropper bottle, which comes with a dropper tip. Once mixed, shake the bottle and pour 4-5 drops into the reservoir of the AirGenie airbrush tool. Test out the color on a spare cookie or white sheet of paper. Add more of any of the colors as needed until you achieve the desired shade.


Using the Press'n Seal, mask off and airbrush the tent element onto the large rectangle cookie.


Proceed with the tent design on the other small round cookie.
Light Brown Elements


For the light brown elements, mix some Harvest Brown and some White colorants until the desired shade is achieved.


Use this color to airbrush the text "REPEAT" on the small round cookie.


Next, mask off and airbrush the arrow elements of the medium-sized rectangle cookie.
Black Elements


Switch to Midnight Black and finish off the "CAMP" text on the small round cookie.


Next, airbrush the "happy camper" text on the arrow design cookie.


Add the rays to the tent and trees cookie.
To the Moon and Back


Finally, load some Bronze Shimmer and airbrush the moon element on the small rectangle cookie with the two trees.
