


Be sure to deliver the second biggest surprise at your next baby celebration with Confection Couture’s Baby Shower / Gender Reveal Confection Collection!
Here are all the stencils included in this collection:

Here are the cookies you'll need:

And here are all the accessories and tools you will need:

- Baby Shower / Gender Reveal Confection Collection
- AirGenie Airbrush System
- Gyro-Cut Craft and Hobby Cutting Tool
- Cookie Magnets
- Plastic Bottle with Dropper Tip
- Quadrant Masking Tool
- DecoPac Airbrush Food Coloring
- Glad Press'n Seal
- Paper Towels

Load the first stencil into the Stencil Genie by separating the two pieces and laying the thicker portion on the work surface with the magnets facing up. Position the stencil so that the design is centered within the square.

Place two Quadrant Masking Tools on either side of the design to protect the edges of the cookie from overspray.
Next, use the other piece of the Quadrant Masking Tool to lock everything into place.

The weight of our cookie magnets can help to keep the stencil flush against the cookie surface. Place them where they are most effective, but not too close to the stencil elements.

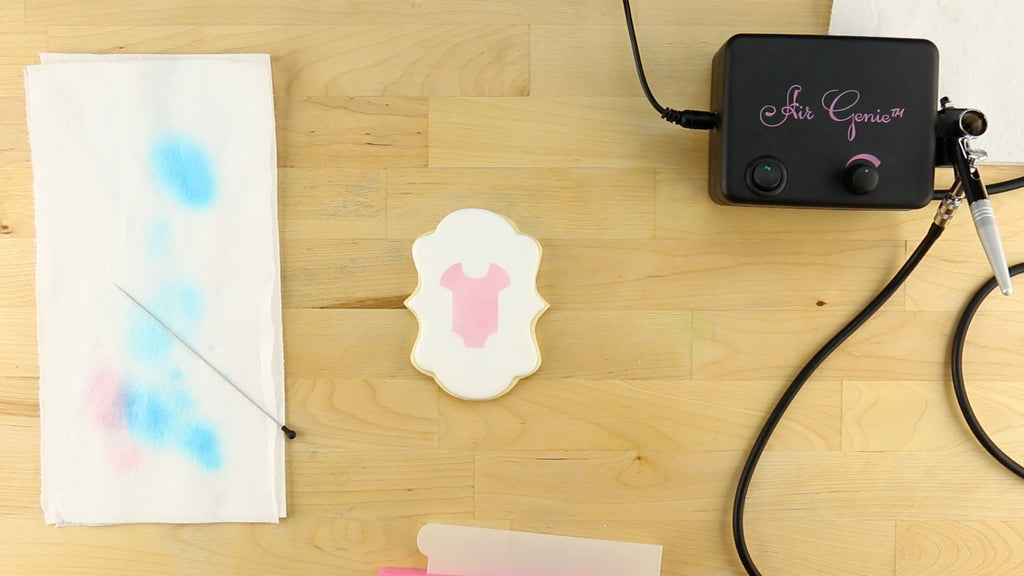
Take the Malibu Blue DecoPac food coloring and shake bottle thoroughly before putting five or six drops into the airbrush tool reservoir.

Test the airflow on a stack of clean paper towels and adjust the flow as needed to achieve a light spray.

Use a long needle or similar tool to hold down any portions of the stencil that are tending to lift away from the icing.
Apply color in light, even coats.

Put this cookie aside and move on to the next one. Clean each stencil between colors by soaking it in a large bowl containing fresh water or rinsing it under a faucet. Pat dry with a lint-free or paper towel.

Repeat the above steps to airbrush the horizontal stripes, moving the needle as needed to keep the stencil flush.

Move from cookie to cookie stenciling one color at a time. This will help minimize the number of times you need to clean the airbrush tool.

For more intricate designs, use Glad Press'n Seal to mask off smaller stencil elements.

Press the plastic over the stencil and flatten to remove any bubbles or wrinkles. First, cut a piece roughly the size of the stencil and then use your fingers to flatten it out, removing any bubbles or wrinkles.

Next, use the Gyro Cut craft and hobby cutting tool to cut around the desired stencil element(s). In this case, that would be the word "He" and the left footprint.

After cutting around the desired portions of the stencil, turn the Gyro cutter blade sideways and use it to lift the corner of the trimmed plastic. Peel away the plastic covering the stencil elements.

Now, airbrush the word "He" and the left footprint using the above steps and the Stencil Genie and Quadrant Masking Tools.

Use Glad Press'n Seal to isolate blue clothes on clothesline stencil.

Move on to the next stencil, which contains the words "What will it be".

Mask and airbrush, as described earlier.
Next, use the Quadrant Masking Tools to isolate the question mark element.

Airbrush the question mark in the center of the blue stripes.

Before switching to the next color, you'll want to thoroughly clean the airbrush tool. Start by rinsing out the reservoir four or five times using clean water.

Next, fill the reservoir with clean water and run it through the tool with the airflow turned all the way up. Repeat this step using water once more and then finally again using an inexpensive 100-proof vodka. Vodka will evaporate quickly and prevent the next color from unintentionally being diluted.

It's time for the next color: Petal Pink. Load a few drops into your clean airbrush tool.

Use the Press'n Seal and Gyro-Cut tool to cut out the "or She" and the right footprint.

Complete this cookie by airbrushing it with the pink food coloring.

Airbrush the next pink element: the other onesie.
Finish the pink onesie and place aside.

Next up are the pink vertical stripes and the onesie outline over the blue horizontal stripes you airbrushed earlier.
 The plaid design with question mark is now complete!

Now, add the pink question mark to the "what will it be" cookie.

"What will it be?"

Next, complete the pink elements on the clothesline design.

Lastly, use the Pearl Shimmer food coloring to add polka dots to the onesie designs.

Repeat this step for the pink onesie.
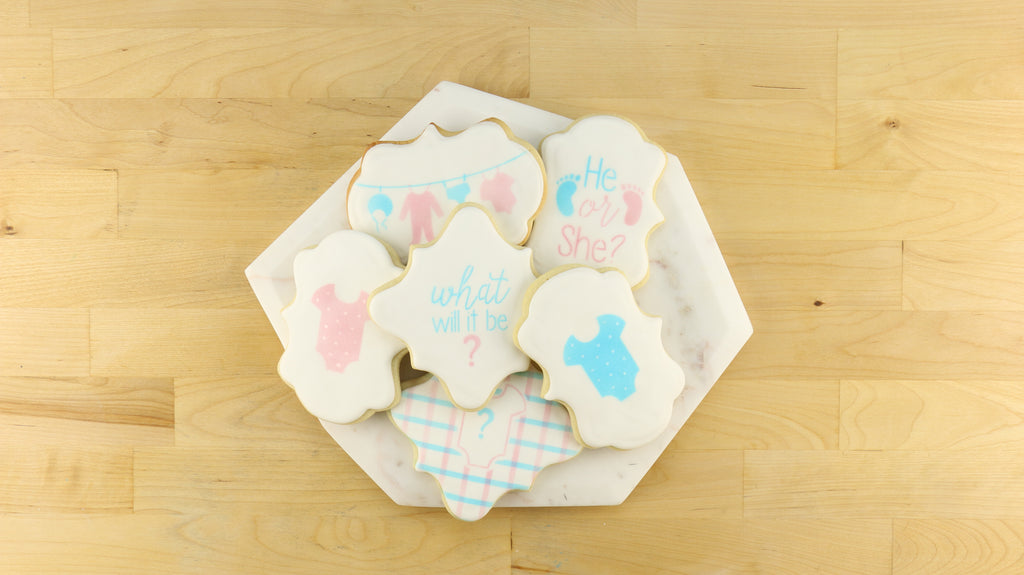
Your Baby Shower / Gender Reveal cookies are now complete and ready to welcome the new little one to the loving world!