


You can cross hugs and kisses off your Valentine's list when you give them these X and O Cookies from Confection Couture!
Here's what you'll need:

- XO Letters Cookie Stencil With Matching Cookie Cutters
- Sugar cookies made with the following:
- Cookie Cutters
- 3 1/2" Heart
- X Letter
- O Letter
- AirGenie Airbrush System
- Cookie Magnets
- Plastic Bottle with Dropper Tip
- Quadrant Masking Tool (x2)
- Stencil Genie
- Stencil Genie XTC
- DecoPac Airbrush Food Coloring
- Super Red
- Guava
- Raspberry
- Eggplant
- Petal Pink
- Pink Sugar Pearls
- Pink Royal Icing
- Culinary Tweezers
- Paper Towels
First step is, of course, baking and icing your cookies.
Making Fondant Hearts


Roll out some fondant until it's about 1/8" inch thick. Then, use a small cookie cutter to cut out as many hearts as you will need, maybe with a couple extra.
Next, load 5-6 drops of Super Red DecoPac Airbrush Food Coloring into your AirGenie Airbrush System tool and color the hearts, making sure to turn them in order to get every side. Set these aside for later.
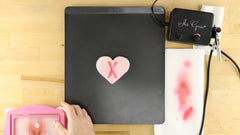
Airbrushing the Cookie Backgrounds


Now, load some Petal Pink colorant into a spare airbrush tool and coat every cookie evenly, again spinning each one to get all sides.
Preparing to Stencil


If your cookies are on the thicker side, try the Stencil Genie XTC which gives your stencil a bit more height as compared to the traditional Stencil Genie. Place it (or the bottom half of the SG) down on your work surface with the magnets facing up.
Place your stencil on top with the "X" centered over inside the square. Place a Quadrant Masking Tool on either side of the "X" to protect the surrounding areas of the cookie from overspray.


Next, place the Screen Genie over the assembly and lock everything into place using the top portion of the Stencil Genie. Now you can place the entire assembly over the first heart cookie, positioning the design where you want it.
Stenciling


Take some cookie magnets and place a stack of three or so onto areas of the screen that need to be pressed flat against the cookie surface.
Load some Raspberry colorant into the airbrush tool. Always text the spray on a stack of paper towels and adjust the flow as necessary using the knob on top of the unit prior to airbrushing each cookie and each color.
Apply the color using numerous light coats. Once complete, lift the assembly to reveal your first stenciled design!


Repeat the above process to airbrush an "O" in Raspberry onto one of the "O" shaped cookies. Every two or three cookies, wipe down the Screen Genie with a paper towel to avoid buildup of the liquid in the mesh.
Mixing Colors


If you want to mix colors, try using a dropper bottle. Add a teaspoon or so of each color and mix the two in the bottle. Test out the color by spraying it onto a white sheet of paper. Adjust the ratio as needed until you achieve the desired shade.
Cleaning the Stenciling Tools


For a more thorough cleaning, soak the stencils and masking tools in water. For the Screen Genie, either rinse it under a faucet or spray water through it backwards using a chemical-free spray bottle. Then, dry everything completely using a lint-free towel or paper towels.


Airbrush every cookie that you want to include a raspberry design.
Cleaning the Airbrush Tool


Before loading a different color in your airbrush tool, you'll want to thoroughly clean it. To do so, rinse out the reservoir with water 3-4 times. Then, reattach the hose, fill the reservoir, and run water through the tool until empty. Repeat this step, once more with water, and then a third time with an inexpensive 100-proof vodka.
Next, load some Guava into the airbrush tool.
Completing the Stencils


Resume airbrushing any cookie elements you want to be Guava.


Now switch to Super Red and continue airbrushing more cookies.
Adding Some Flair


After all of your cookies are airbrushed, add some three-dimensional flair with some pink sugar pearls. Add a drop of royal icing to each pearl and use it as an adhesive. Create a border around some or all of the heart-shaped cookies.
Also use the royal icing to attach the fondant hearts you made earlier to some of the cookies.
Your XO cookies are complete and ready to make your friends, family, or special someone fall in love all over again!
