


Spread the fun around with these Do-It-Yourself Sprinkle Stencils from Confection Couture!
How do you make sprinkles with stencils?
How do you stencil sprinkles on a cake?
Using our stencils to make your own sprinkles gives you so many more options to choose from as opposed to purchasing pre-made sprinkles at the store. We have sprinkles for all seasons and occasions. And isn't making them yourself just more fun?? Click here to see all of the different designs we offer!

Tools and ingredients used in this tutorial:
- Assorted Dots Sprinkle Stencil Set
- Assorted Hearts Sprinkle Stencil Set
- Assorted Stars Sprinkle Stencil Set
- Assorted Graduation Sprinkle Stencil Set
- Assorted Fall Sprinkle Stencil Set
- Baker's Spatula
- Wax Paper
- Royal Icing Ingredients
- Meringue Powder
- Gel Colorants
- Confectioner's Sugar
- Water
Applying the Royal Icing to the Stencil


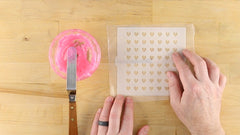


First, make your royal icing (recipes can be found online) and color it using Gel Colorant. You can mix colors to come up with your own unique shade! Remember, when it comes to gel, a little goes a long way so start off with a drop or two in your icing mixture and then go from there.
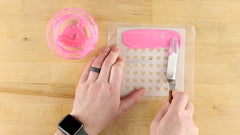
Next, use a baking spatula to spread the icing in a thick layer over the entire stencil, making sure to completely cover every design opening.


Use a cookie stencil scraper to press the icing into the stencil while keeping the layer nice and thick. The goal here is to leave a nice smooth layer over the entire stencil.
Now, carefully peel the stencil away from the wax paper taking care not to smear the icing beneath as you lift.
Now, place the sheet aside and wait for the icing to dry completely. Be sure not to stack anything on top of the sheet while it dries!


Repeat for all other colors and/or stencil designs. Next up we made some red icing to use on the Star Stencil.


We made orange icing for the Pumpkin design.


And lastly, we made some black frosting for the Graduation Caps Stencil.


After the icing has hardened completely, use an appropriate tool to carefully lift each sprinkle, freeing it from the paper. If necessary, try curling the wax paper underneath to help get it loose. Doing this over a mat or similar item will aid you in dumping the sprinkles into a small dish.


Next up are the Graduation Cap sprinkles.


Now, separate your Red Stars.


Set your Fall spirit and Orange Pumpkin sprinkles free!


Lastly, separate your Blue Dot sprinkles.
Your whimsical sprinkles are complete and ready to take your baking project to the next level!


For more tips and ideas, visit ConfectionCoutureStencils.com.